Many years I was hesitant to buy into a large format / medium format viewcamera system, such as the Cambo Ultima 23D with Leaf Aptus 22. After serious consideration five years ago I chickened out and bought a Pentax 645D. When I finally sold the Pentax to get this system two years ago, not all went as planned. This blog post is for newbies like me to get some pointers that I missed initially. Please feel free to ask additional questions in the comments section, I love to talk about gear. 🙂
Confession upfront: I jumped for this system when I thought I would be able to get it complete for around 5.000 euros, but eventually it cost double that amount and seriously hurt my savings. Still not much for a high end digital viewcamera system, but given the age of the components you should be able to get this cheaper with a little patience.
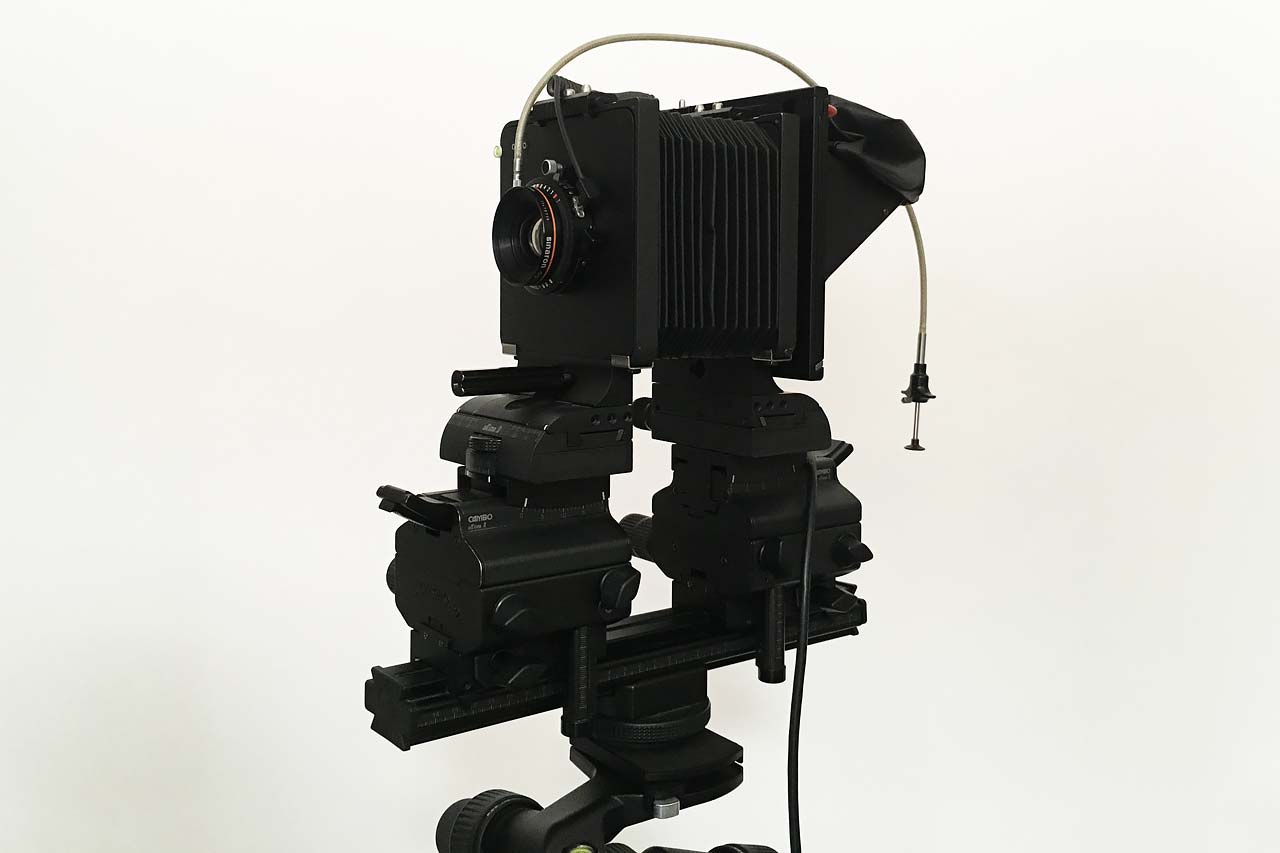
Large Format viewcamera with digital back
A compact camera has every part of the camera in one: the lens, the shutter, the controls, the light-tight body and the sensor. With a viewcamera system everything is separate.
- You have your digital back, which is the sensor and all electronics associated with it, usually powered by its own battery or through a cable. It also has the card slot and / or tethering connection.
- You have the body, which is the actual viewcamera. Mostly it consists of a rail with two squares above it that can be moved in all directions compared to the rail / each other. This makes it possible to adjust perspective and focus in all possible ways.
- You have the lenses, these consist of a front and back part with thread that can be screwed onto a shutter. There are different shutter sizes, most common is Copal No. 0, which is also used by the Ultima 23D. The shutter also contains the aperture. Copal used to make these until 2013, nowadays Rodenstock makes a replacement aperture, but this comes without shutter because modern backs have an electronic shutter capability. For older backs you NEED the shutter. It is best to buy a lens including a shutter, to be sure they fit and work together.
- To attach a lens you need a lens board. A lens board for Ultima 23D will fit in the front square of the viewcamera and has a hole for Copal 0 shutters (which is standard for the Cambo Ultima). You can unscrew your lens / shutter combination and screw it back together over the hole in the lens board.
- The digital back needs to be attached with a sliding back that fits onto the back square of the viewcamera. The sliding is for you to be able to switch between groundglass view and the digital back.
- Between the squares, so between the lens and the sliding back, you need to put a bellows to make it dark, so no light reaches the sensor that hasn’t gone through the lens.
- In practice the front and back squares are the same, so everything also fits the other way around. The only difference is between inside (where the bellows fit) and outside. The outside connections have an extra locking button to prevent your expensive lens or back from accidently falling off while removing them.
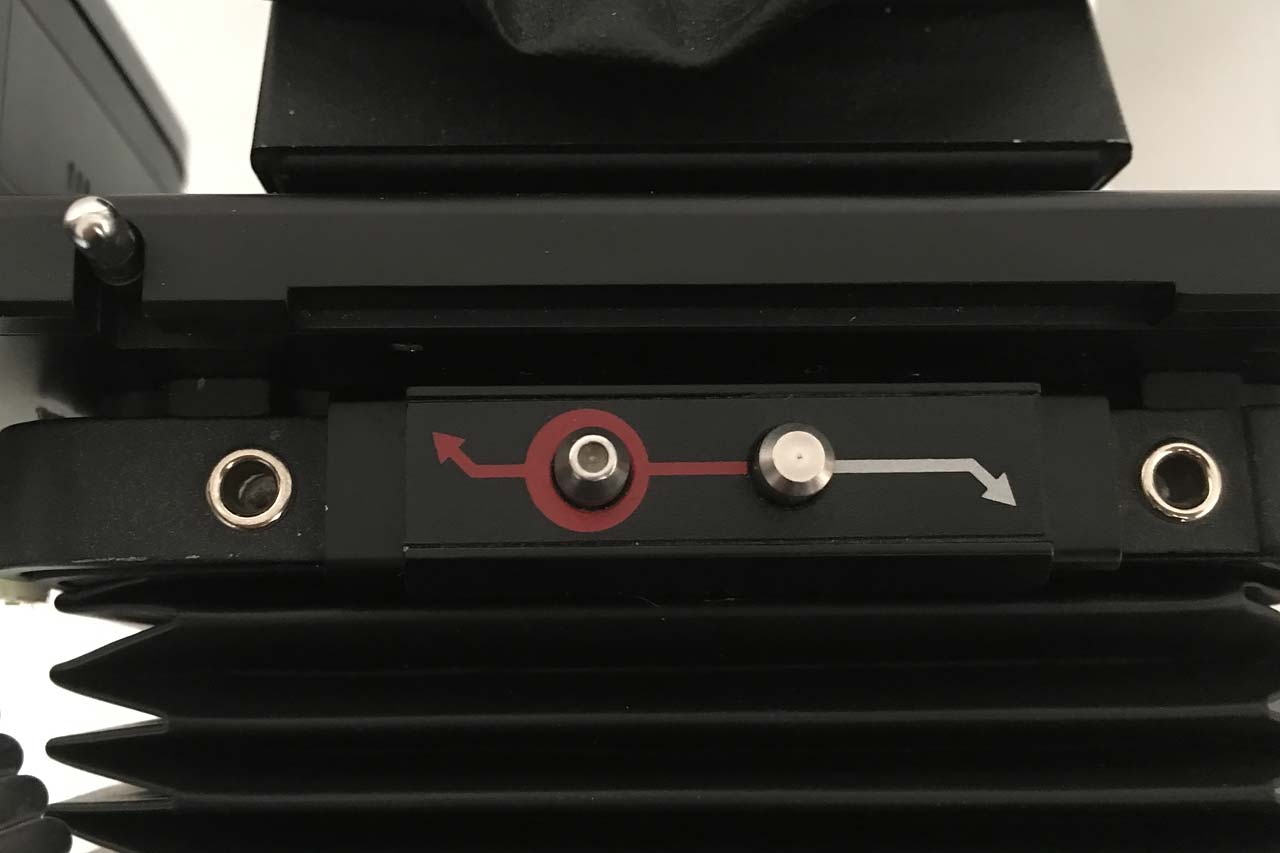
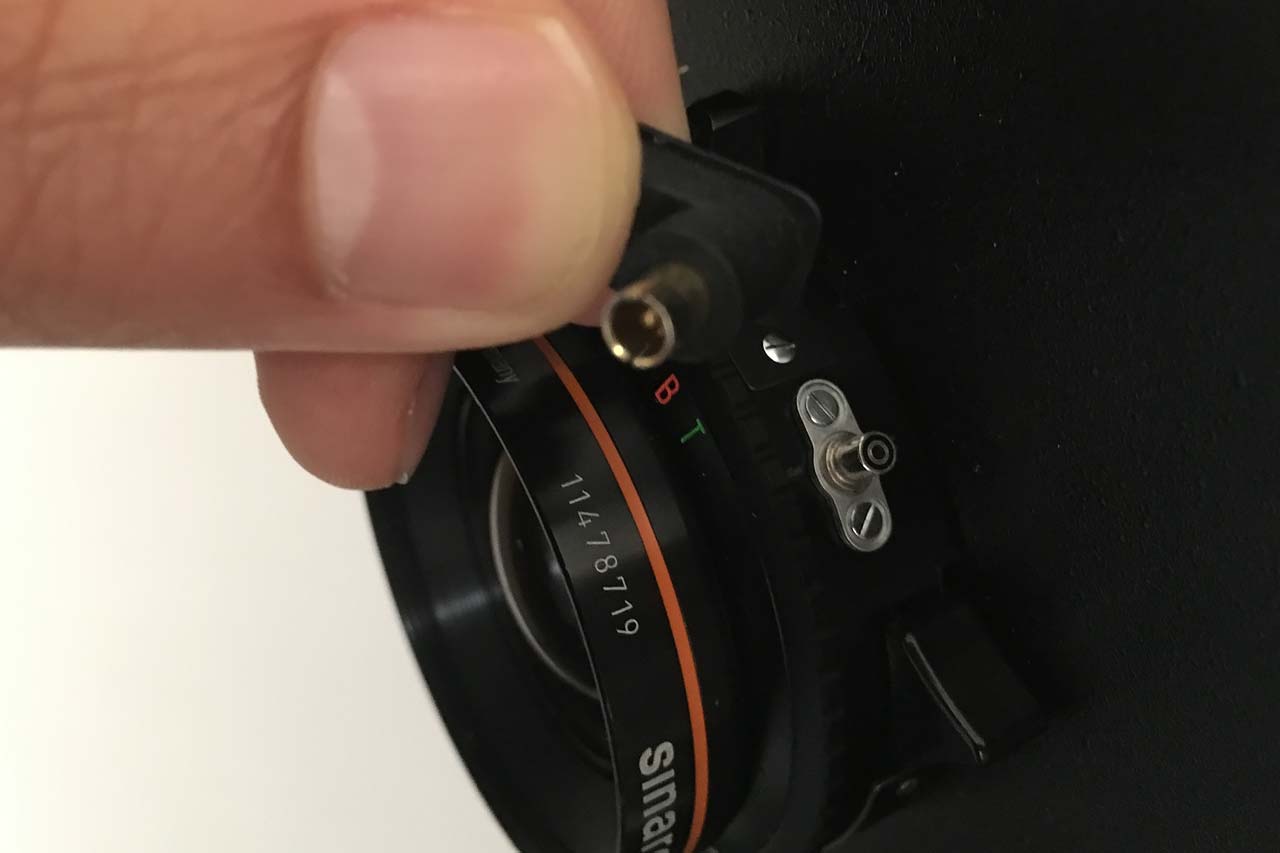
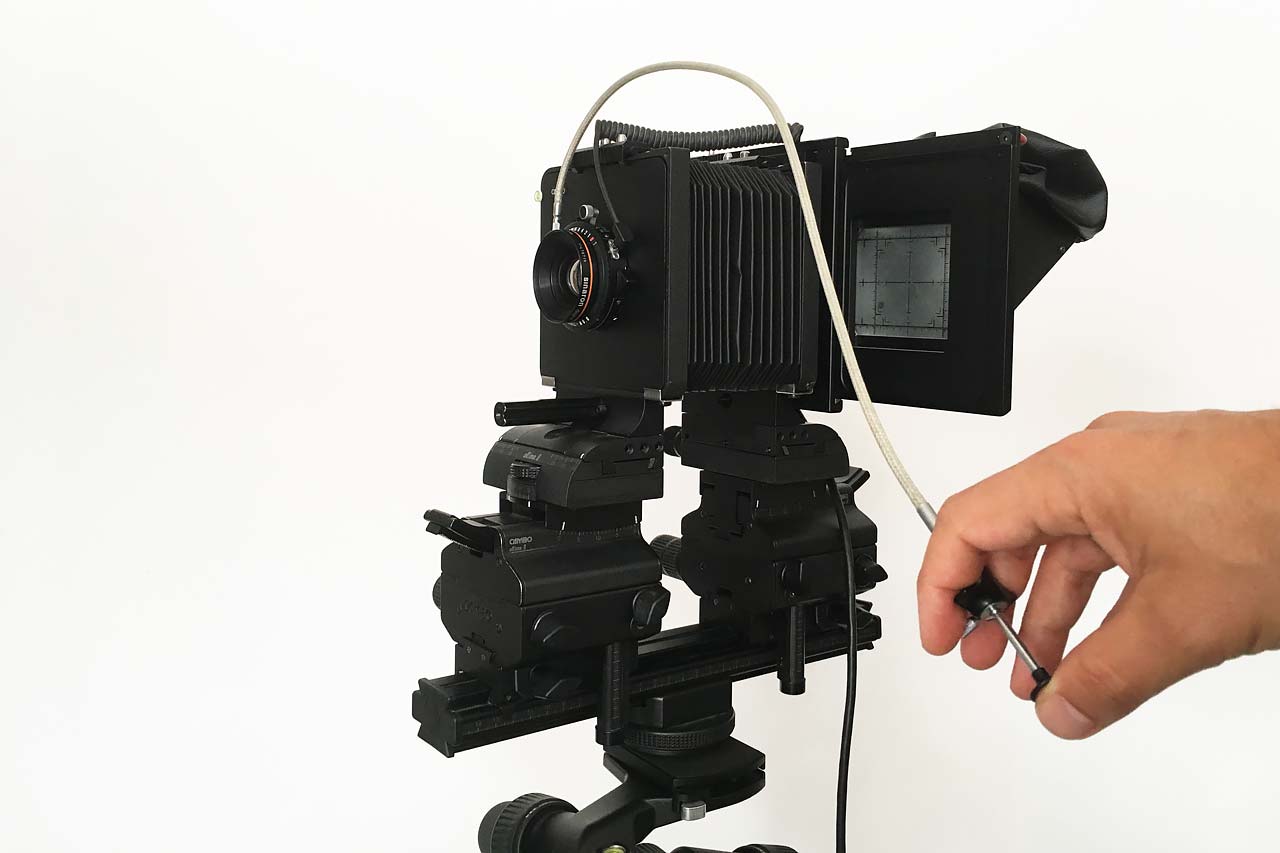
- Now you need a couple of cables to trigger the shutter and the back. The shutter contains a standard pc (old-fashioned flash-) connection that you run to the input jack of the back. When the shutter fires it fires the pc connection as well which fires the back. The back itself also has a pc connection that fires when the back receives the fire signal so you attach your flashes to the back. This works reliably up to shutterspeeds of 1/500 second (the fastest for Copal shutters). Because Copal uses a leaf shutter, the flash sync speed is also 1/500 😀
- You trigger the shutter with a regular cable release. There are also electronic shutters, which are triggered with a commander (like the Rollei LensControl S).
Why is it called large format? Originally viewcameras are made to hold large film sheets, typically 4 x 5 inch or even 8 x 10 inch. With the advent of digital backs the viewcamera was adapted, like the Ultima 23D, for use with a smaller recording surface of around 6 x 6 cm (2,3 x 2,3 inch), which is actually called medium format (as it sits between large format and the smaller more common 35 mm format invented by Leica). But the bulky viewcamera still has that large format feel, and it uses the same large format lenses with large image circle for extreme movements.
Digital medium format sensors are smaller than the original 6 x 6 medium format. A digital medium format sensor is typically 36 x 48 mm, but sizes may vary. It’s still called medium format because the sensor is much larger than ‘Full Frame’ which is based on the 35 mm format (24 x 36 mm), commonly called small format, at least in the Netherlands (kleinbeeld).
Cambo Ultima 23D
I always wanted a viewcamera system, but were afraid to jump in, because I had no practical knowledge of it. That changed at the Fotoacademie, where I learned to work with a whole range of viewcameras. The Cambo Ultima quickly became my favourite, because it is quite small (for a viewcamera), has all the movements in large ranges, works very smoothly and locks easily and reliably. It comes as a 45D (large format) or 23D (smaller, intended for digital backs). I got mine, including sliding back for Hasselblad H backs, a wideangle bellows, a Rollei LensControl and 90 mm APO Digitar with electronic shutter for 2.500 euros, which is a bit expensive considering the condition, in hindsight.
Points to take away regarding the Cambo Ultima 23D:
- You need a sliding back on the Cambo in order to fit your digital back. There are old sliding backs, specific for each brand of digital back, and newer ones, with an interchangeable adapter for digital backs. All the Cambo parts are expensive, even second hand. When you get an old sliding back you have to buy a WHOLE new sliding back if you need to fit another brand of digital back. If you have a newer one, you can just buy the separate adapter (about 1/3rd of the price of the sliding back). Of course, since I didn’t know this, my Cambo included an old sliding back… You can recognize the newer ones by the two red sliding knobs that secure the adapter.
- The electronic shutter and controller are not very popular anymore, I have been trying to sell mine for ages (since I don’t use it).
- Groundglass should be clear, obviously, but in my excitement I forgot to check and it turned out to be pretty clouded. You can buy a groundglass separately, but it will cost you as usual.
- Standard rail is around 35 cm long, this is sufficient for most purposes.
- Wideangle bellows (a black bag) is also sufficient for most purposes, including portrait shoots. But not for close up product work, smaller items like photographing a screw, you need the regular bellows for that.
- For any focusing in the distance (from a couple of meters) even with movements, you need the wideangle bellows also with a normal lens like the 90 mm.
Leaf Aptus 22
Now I needed a digital back. My whole career as a photographer I have always owned two of the same camera’s so I would have backup when one failed me and until then use them alongside. So I wanted to buy 2 digital backs of the same brand and preferably type. After extensive research I wanted a Phase One P45 or newer, but could not afford one. They are still on my list though. I looked into Leaf because especially the older types are relatively good in terms of image quality. I didn’t like the fan and the touch screen, and I still don’t, but that is a minor issue if you look at the image quality compared to the price.
The Leaf Aptus 22 has a 36 x 48 mm sensor (twice the size of ‘Full Frame’ like the Canon EOS 5D or Nikon D850) without anti aliasing filter. This means it records the light without smoothing the image and as such can take very sharp, very detailed photographs, at the expense of artefacts sometimes which you can remove in Photoshop. I found a used Aptus 22 at Cameraland for 1.900 euros which they let me borrow for a week (!) alongside an Aptus 7 II (!) so I could assert the differences. A second Aptus 22 turned up at Calumet after some phone calls while I was there for something else. It sold for 2.000 euros, but Calumet threw in a used Mamiya AFD III + 80 mm for free which took care of my wish to have a backup system.
Points to take away regarding the Leaf Aptus 22:
- The touch screen is very bad compared to modern screens. It’s also very slow and almost invisible in direct light. Contrast is bad. Don’t rely on it.
- I regularly touch the screen with my nose while using the Mamiya. Luckily you can disable touch, but you have to disable it every time you start up the back.
- Startup is also slow (like half a minute or more).
- Battery life is not great.
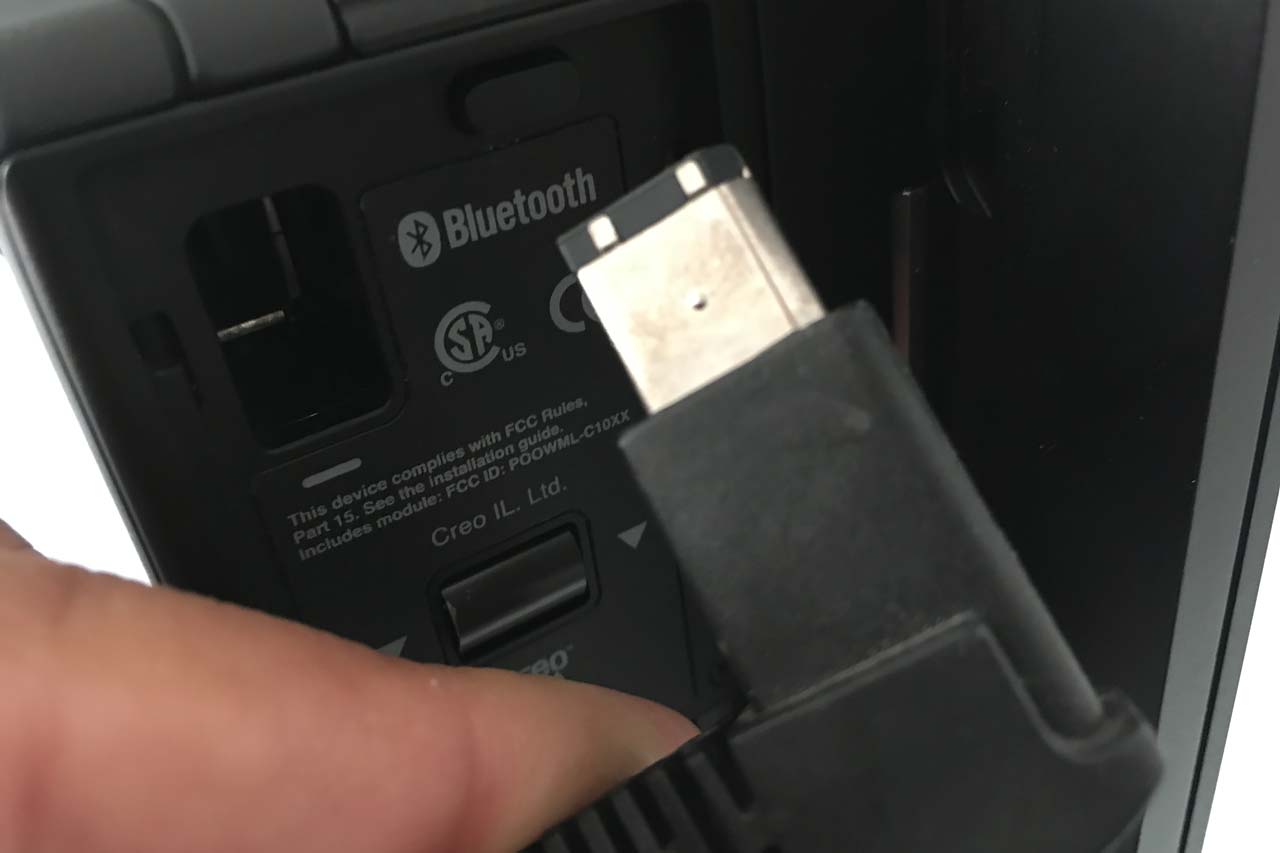
- It has a very peculiar Firewire connection, which means you can only use the original Firewire cable (180 euros new). Also: Firewire is dead, so shooting with a modern laptop is difficult, I have not gone into that minefield and use my desktop pc with a Firewire card (which works ok).
- Only after I bought these backs I found out they REQUIRE Capture One to open the raw files, and the Aptus 22 is too old to be in the Phase One program where you get Capture One for free. Don’t get me wrong, I like Capture One a lot, but I could do without the 12 euros a month it’s adding to my bills.
- These old backs have a native ISO of 25 (yes, twenty five), so they need a lot of light. When you crank the ISO up to 100 you see noise appearing. The upside is, on ISO 25 they are ridiculously noise free, I have never seen such clean files except from the newer digital backs. Not even the EOS 1’s and Pentax 645D that I used for a long time have such clean files.
- Liveview is handy while finetuning the focusing sometimes, but it is slow and black and white only. And only while shooting tethered (which doesn’t matter because the screen is too bad for liveview anyway).
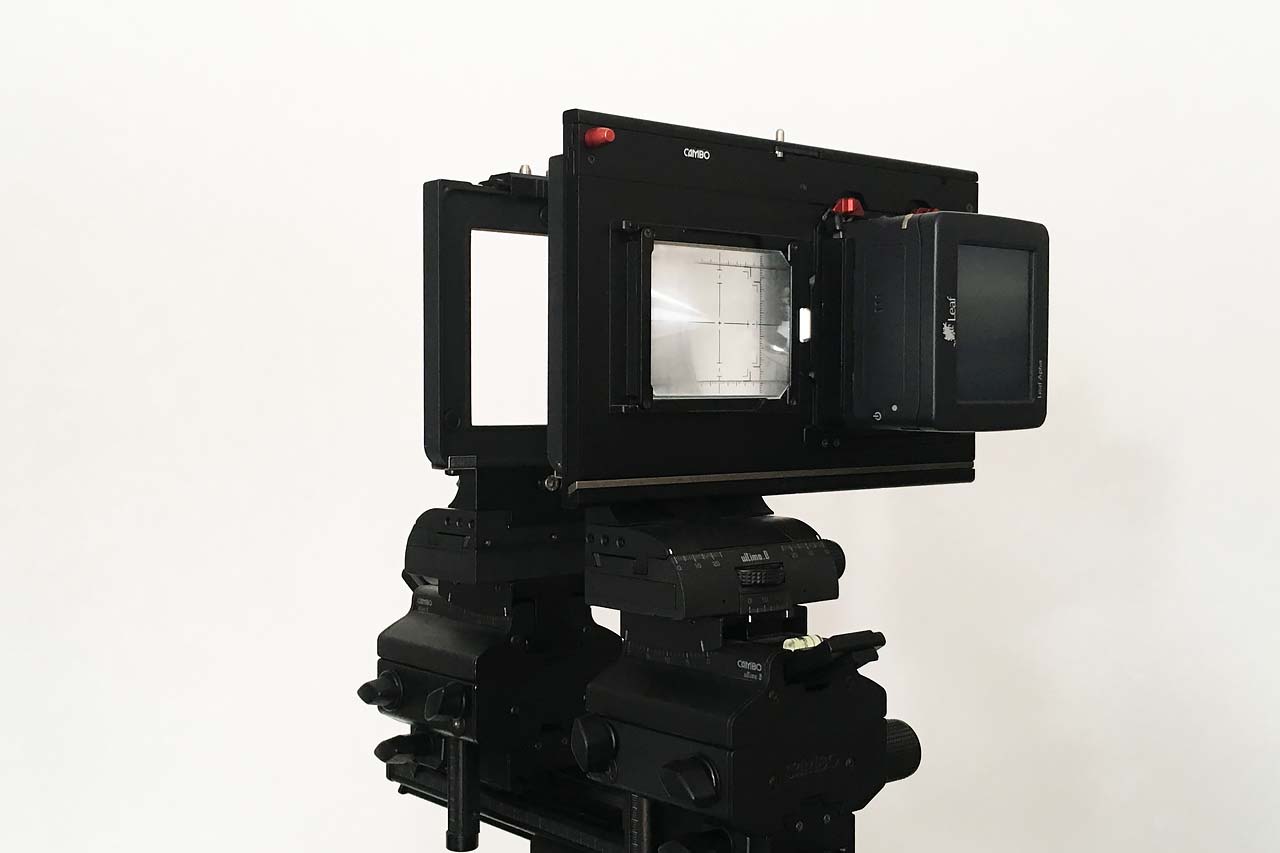
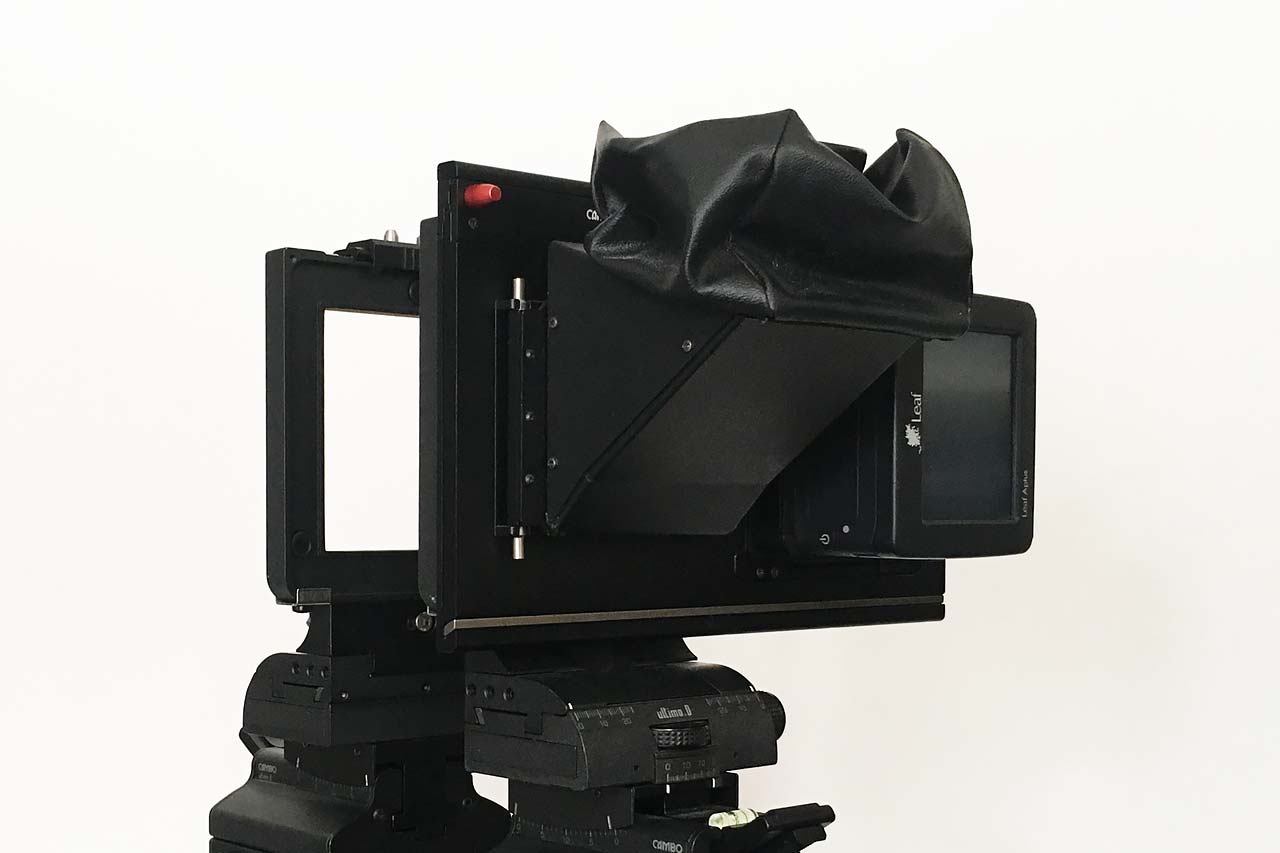
So by then I had found out that I needed another sliding back to fit the Leaf to my Cambo. I found one on Ebay for 900 euros. Could have been cheaper probably but I didn’t want to wait any longer. When I got it (from Finland) the sliding part was stuck. Luckily the Cambo factory is in Kampen which is an hour’s drive from my house, so I could easily get it serviced there. They showed me it had also been damaged, but that it would not affect the photographs and functionality. They serviced it for 100 euros. In total this was too much money I think. But at least I have the new sliding back now, with a good groundglass, it slides smoothly and includes the Leaf digital back adapter. Also it came with a rather luxurious focusing aid that is normally sold seperately. Attached to the sliding back came a mirror and magnifying glass assembly that lets you inspect the image on the groundglass without having to put a dark cloth over your head against the light.
Large format lenses
While waiting for the sliding back to arrive, I had sourced a couple of lenses with mechanical shutters. The Fotoacademie had a 45 and 90 mm already mounted in the Cambo 23D lens board that I could take over for 1.400 euros, which is on the expensive side (we had a miscommunication about the price, but I still decided to get them while I was there, being impatient). The mechanical shutter is great and the lenses are as well. I had an old fashioned cable release lying around which works perfectly. With the Cambo also came a trigger cable for the back and the Fotoacademie gave me a slighly longer one with the lenses.
Even though this was a fine setup already, for closeup work on products for instance the 90 mm just doesn’t cut it. So I wanted to get a Sinar Sinaron 120 mm f/5.6 macro, which has legendary quality (according to the internet). With patience I later found one for only 650 euros including the Copal 0 shutter on Ebay. Needless to say I pounced on it. When it arrived it was flawless. I bought a lens board and the regular bellows new from Cambo and mounted everything. This is now my favourite lens.
Accessories
To be able to use this stuff I also needed a heavier tripod and a case, which set me back another 1.250 euros. For the Mamiya I found a nice like new 210 f/4 on Ebay to be able to shoot in the woods and for portraits, and some new batteries from a local store for when I’m on the road for a total of around 300 euros.
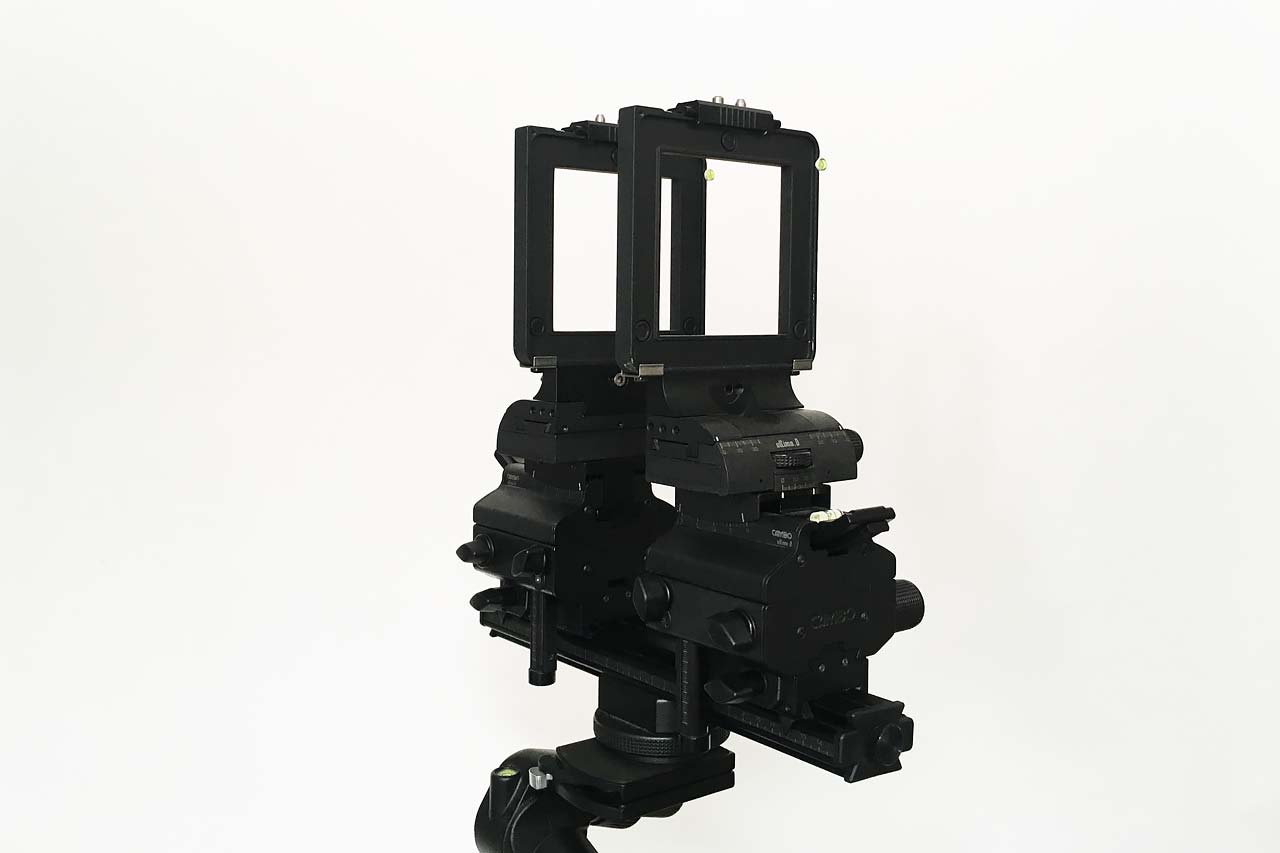
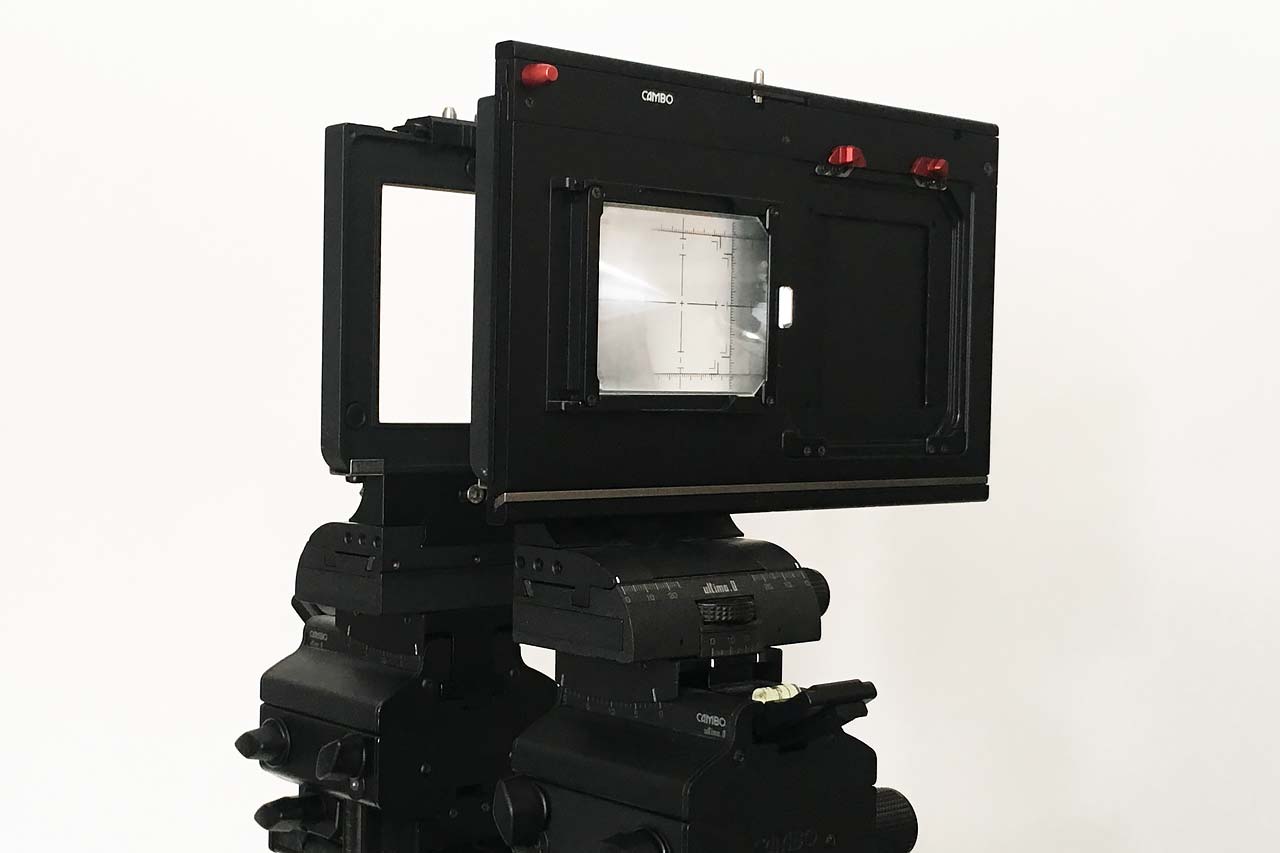
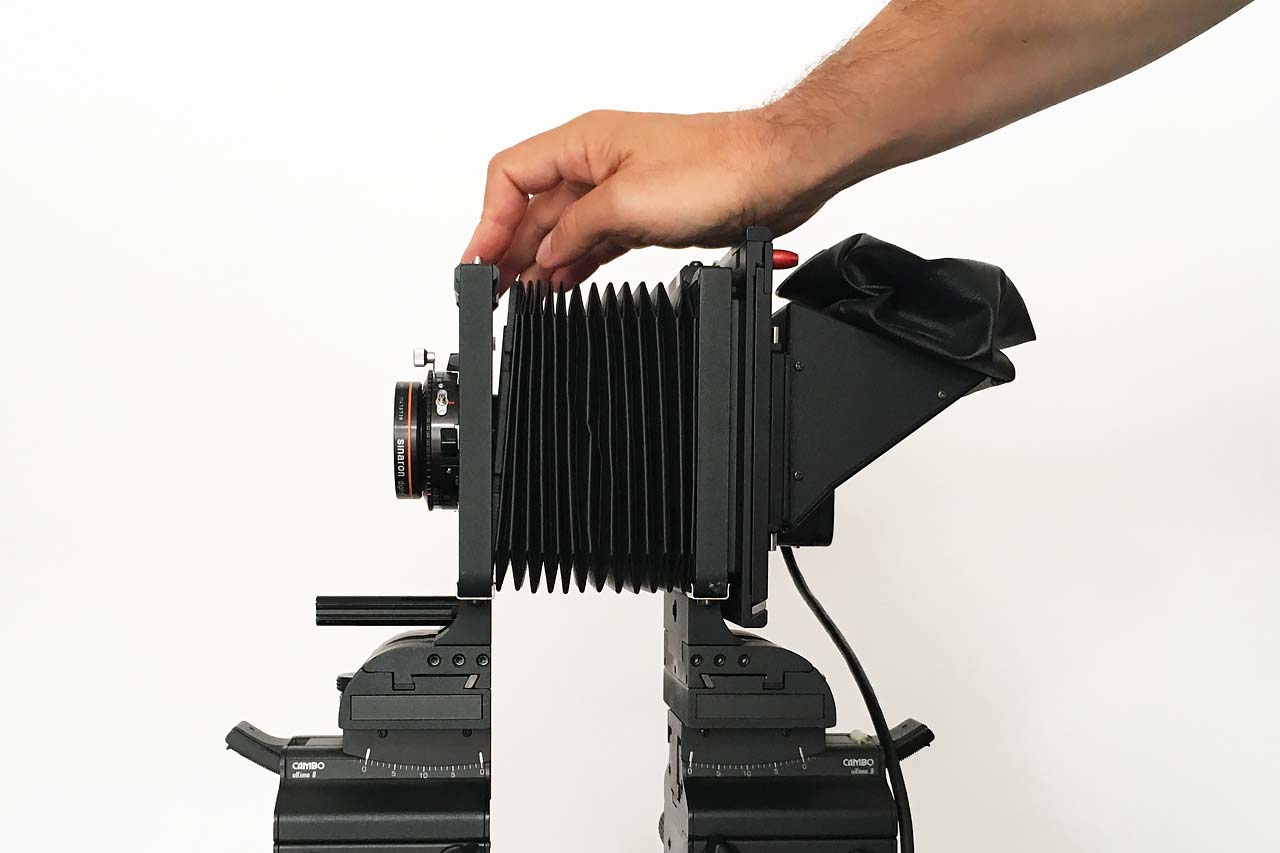
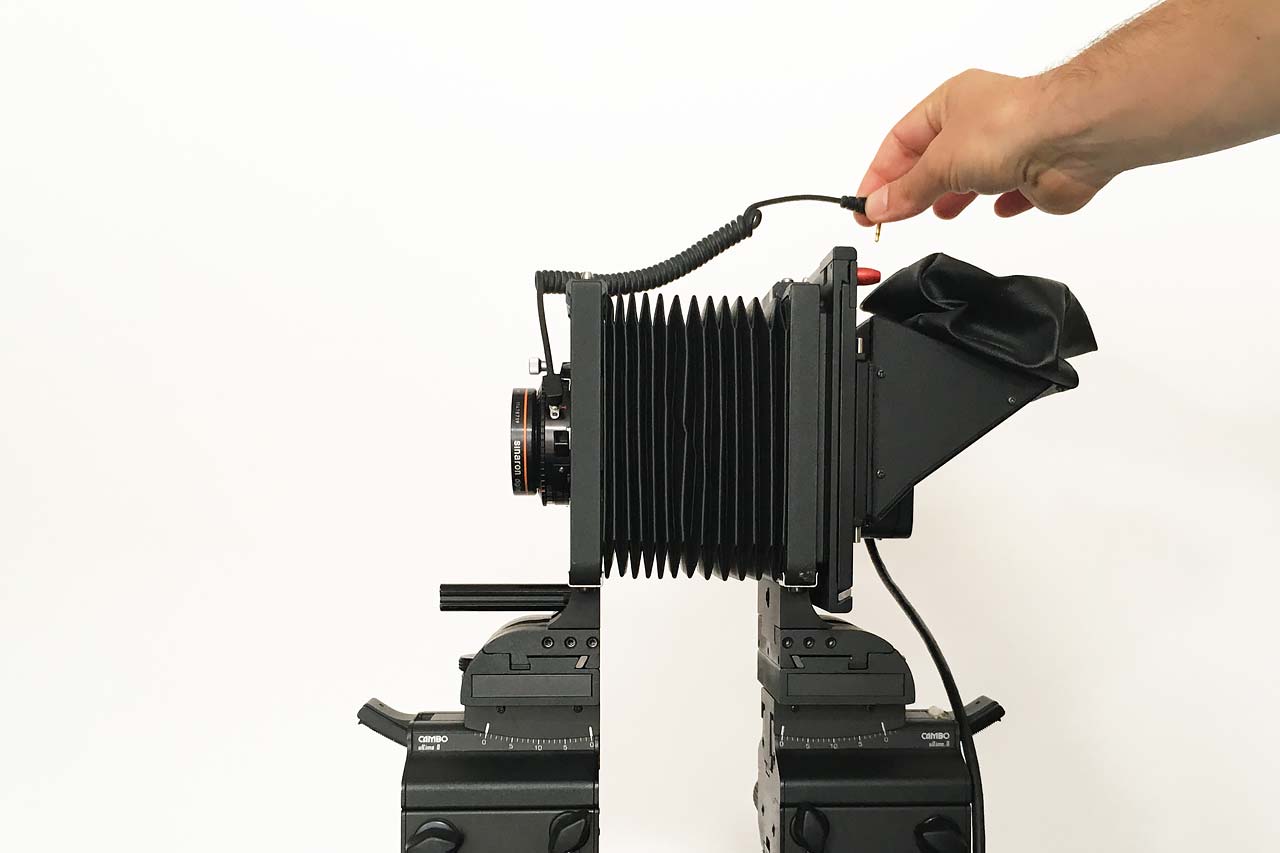
Assembling the digital viewcamera kit
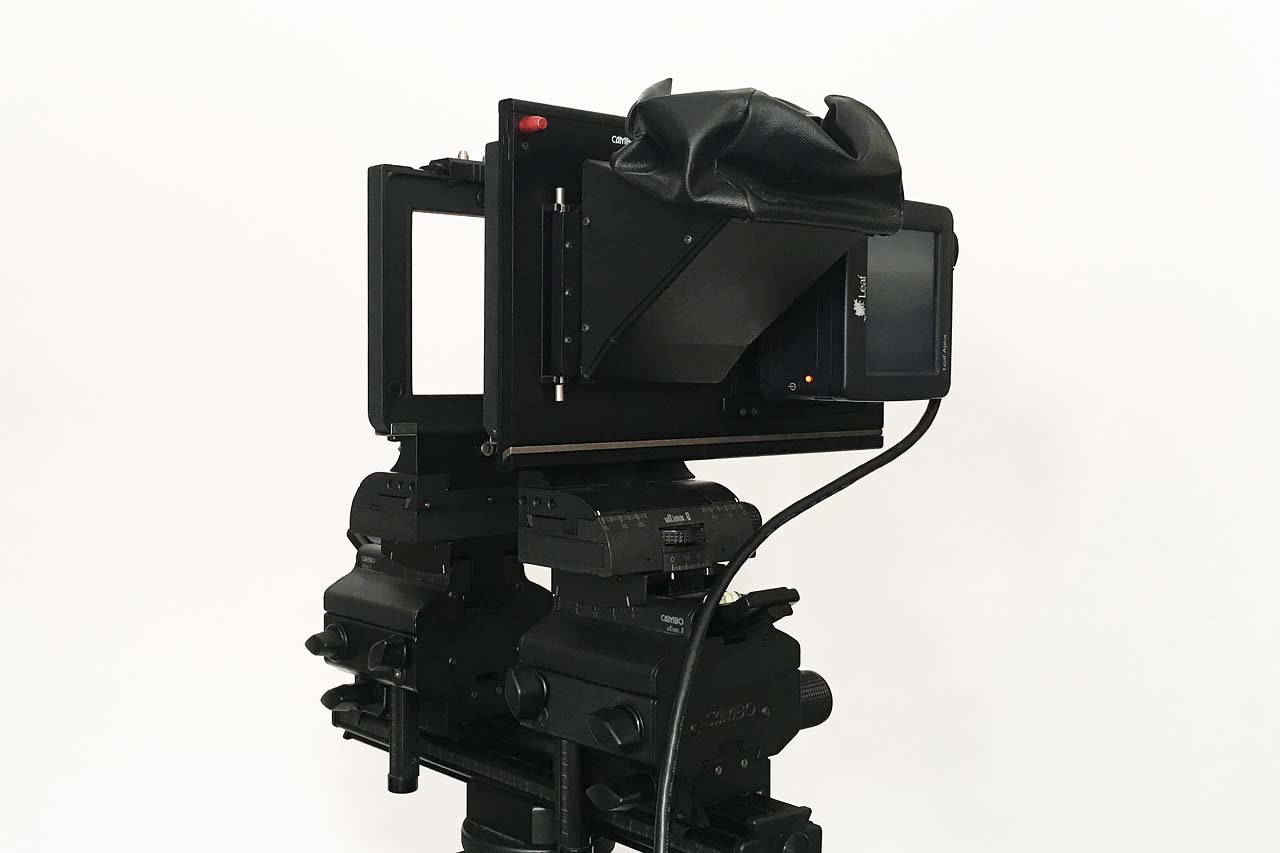
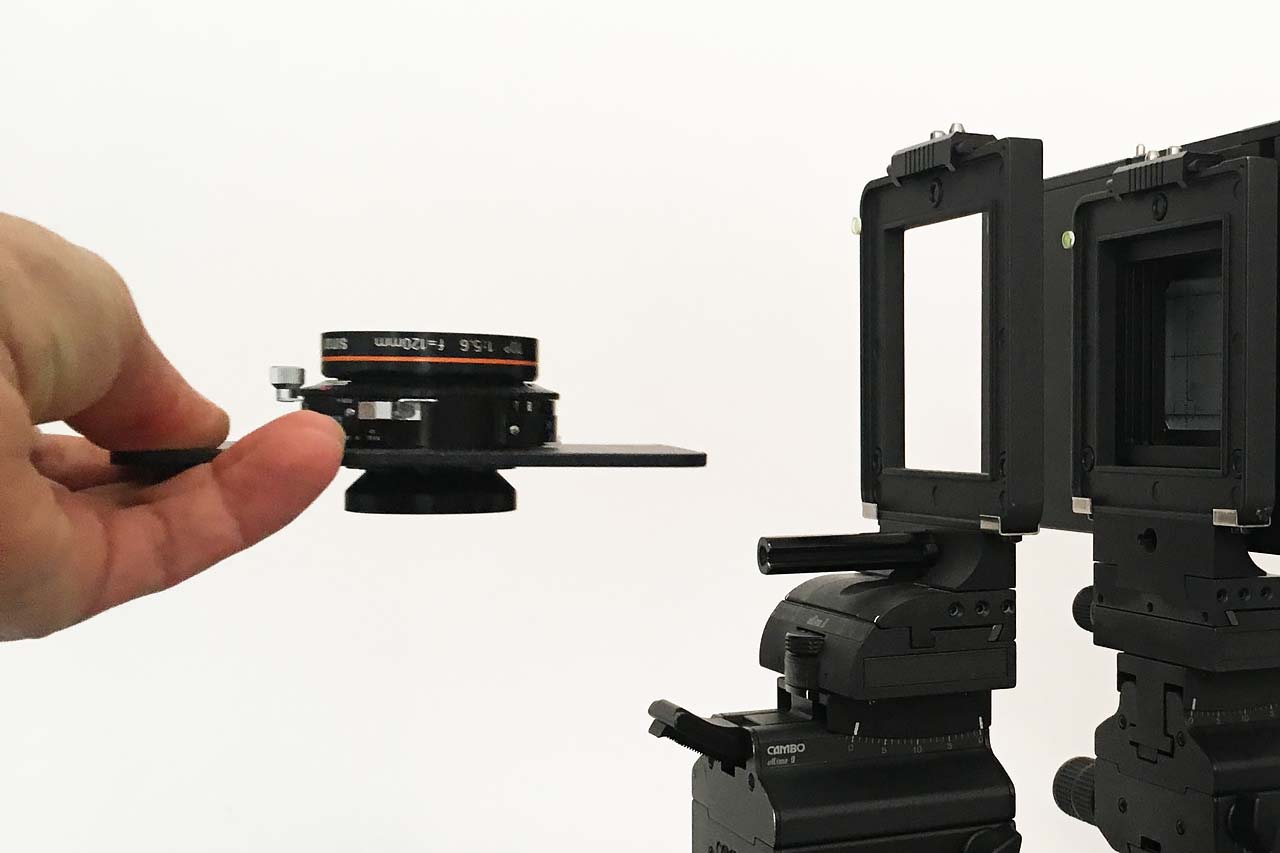
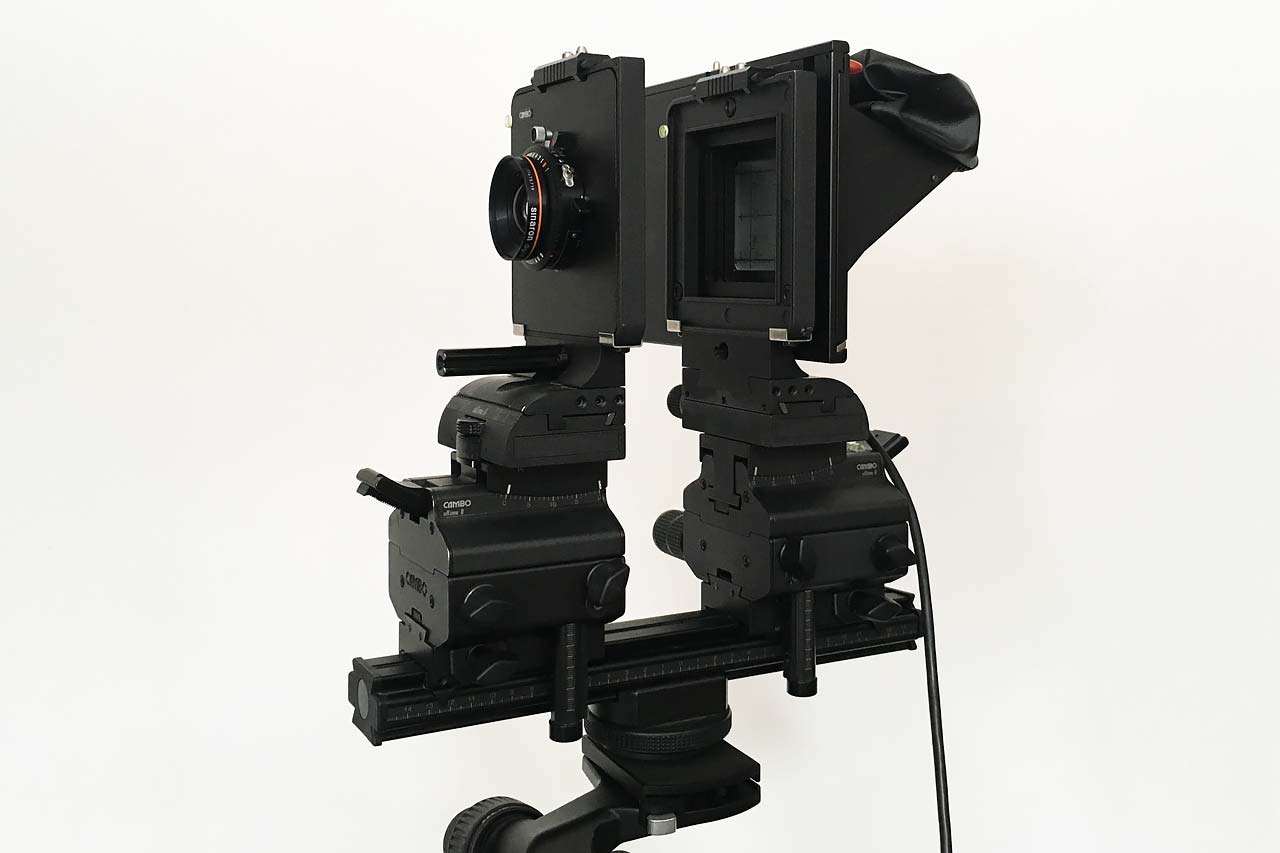
Some pictures to clarify what has been said:

Pros
- The large sensor combined with large format lenses and movements lead to a very pleasing look in the photographs.
- At ISO 25 the files are clean like a fresh mountain stream, just awesome.
- Digital back and viewcamera are a very versatile system with a lot of interchangeable parts and additions, it can grow in any direction.
- I can shoot exactly how I want now (digital, with movements).
Cons
- Very bulky system.
- Sharpness is not necessarily better than with other systems, for instance the Pentax 645D which I owned for three years is sharper in some situations (judged with large prints).
- The backs are from 2006, they show their age, really uncool to work with outside of the studio, they’re extremely slow, freeze sometimes when on battery power and the screen is virtually unusable. Having a complimentary full frame camera system would be handy.
- The Aptus 22 needs a lot of light to perform at its best, the noise is terrible at ISO 200 and even ISO 100 I tend to avoid.
Aptus 22 + Ultima 23D: not for everyone
I guess you could say such a system is not for everyone. But I am very happy with it. It is a very capable system and can yield absolutely stunning files when used correctly. It’s future proof, a newer digital back would fit right on it, with a new adapter if it’s not a Leaf. New and old lenses as well, by all sorts of manufacturers. It can deliver stunning and amazingly professional results not attainable with any other system of the same price, especially in studio portrait, product and interior photography.
However, dropping 10.000 euros into a Canon / Nikon / Sony / Pentax system would give you a host of other possibilities like shooting fast and with less light (even in total darkness nowadays), the ability to take your gear with you easily, judging focus and exposure from the screen, tethering to a laptop… Those are things I really miss.
The Cambo and Leaf set: inventory
The large format viewcamera with medium format digital back system I now own is a minimalistic system that is quite versatile but nothing extreme, you could add a lot more. It has some backup features so the risk of you looking like an arse in front of a client is reduced. This is the complete inventory for your benefit. This is not to brag but to show each and every part that you need to get a working system. If a part is redundant or for backup it is marked in the list. The last column is the price I paid in euros, so you can compare when you see something for sale. With the exception of the 120 mm and the Aptus backs I think I overpaid slightly. Prices include taxes.
| Leaf Aptus 22 | Primary digital back | 1.900 |
| Leaf Aptus 22 | Secondary digital back | 2.000 |
| MamiyaLeaf 199A02161 | Firewire cable, one came with the back from Calumet, bought one extra for backup | 100 |
| Cambo Ultima 23D | Viewcamera, including sliding back (bad condition), electronic shutter with commander, 90 mm normal lens and wideangle bellows | 2.500 |
| Sliding back | With groundglass, mirror + magnifying glass assembly and Leaf digital back adapter | 1.000 |
| Mamiya 645DF III + 80 mm | Backup camera, included with one of the backs | 0 |
| 90 mm APO Digitar in Copal 0 | Normal lens | 650 |
| 45 mm APO Digitar in Copal 0 | Wideangle lens | 750 |
| Sinar Sinaron 120 mm in Copal 0 | Macro / product lens | 650 |
| Lens board for 120 mm | It came without lens board | 75 |
| Standard bellows | Needed for closer focus | 175 |
| Cable from lens to back | Two, for backup; one came with a lens the other came with the Cambo | 0 |
| Manfrotto 057C4G | Carbon tripod | 550 |
| Manfrotto 405 | Geared head | 450 |
| Calumet Case | To hold the Cambo, one extra lens and one Aptus, backup stuff is in a separate photo bag | 225 |
| Cable release | Had one lying around | 0 |
| Rollei LensControl S | Backup, came with the Cambo, for sale | 0 |
| 90 mm APO Digitar in electronic shutter | Currently used as a backup lens together with Rollei LensControl S | 0 |
| Mamiya 210 mm f/4 | And some extra batteries, for use outdoor | 300 |
| Backup wideangle for Mamiya | On wishlist |
Using the Ultima 23D with the Aptus 22
To work comfortably with the digital back mounted on the viewcamera you best shoot tethered. I use a desktop pc with firewire card, this worked right out of the box with the special Mamiyaleaf firewire cable. Capture One recognizes the Aptus 22 and can control it and show the liveview image (black and white only). You have to startup everything in a specific order however which leads most of the time to me restarting the pc to get it to work, but once the camera is recognized it keeps working reliably until I close everything.
Nice about Capture One is that it has a wifi connection to their app, so your client (when present) can follow your work on a tablet without hanging over your shoulder.
What are your experiences with this sort of camera system? New or second hand? I’d love to hear from you. If you want to know anything regarding large format, medium format, digital backs, not necessarily pertaining to the Cambo Ultima 23D or Leaf Aptus 22 backs, ask your question below or contact me directly. I love to talk about gear!
Hi there, I love this post. So much valuable information. I’m wondering if you can offer any feed back or advice on multi stitching with your camera, lens and back combo? I have purchased an ultima 45D, and am planning to complete the setup with a Schneider super symmar HM 120mm 5.6 lens and a phase one P45+. I shoot tableaux on large exterior sets/locations. Very much in the vein of Gregory freedoms work. Specifically I’m hoping I can use the front standard for a small amount of perspective control, and use the rear standard to move the db up and down so I can stitch together up to 15 overlapping images to achieve a virtual gate of approximately 80mm by 100mm. A fairly large image area I know. I’ve had some suggestions that the super symmar HM should out resolve the 6um pixel pitch of the p45+, and the combo of those two should keep colour fringing to a reasonably acceptable degree. I will be using a stitching back for the horizonal shift, and use the rear rise for the db movements. I’d love to know if you have any light to shine on this aspect. Cheers….
Hi Andrew, sorry for getting back so late, since I get less than one comment a year on the blog I stopped looking and missed yours. Indeed the rear standard should be used for stitching and not have any tilt / swing applied. I have not done any stitching myself but the resolving power of those large format lenses surprised me in a good way. Fortunately color fringing can be corrected quite well in post. Very curious to see some results from your setup.
BTW I love your ‘The party’s over’ photos, are those stitched (would have to see large prints of course to appreciate it).
Hi Joeri,
I came upon your post only recently. Very nice read. Altough I passed my exam (fotovakschool, long ago) using a pretty primitive Cambo, I felt at the time that this would not be my favourite camera ; too cumbersome for me. Happy with a 6×6 H’Blad , my attention was more towards lighting equipment and the steep learning curve to control that, in order to make a living (which was still possible back then). It didn’t happen as planned but I stayed hooked on photography. Even bought a Sinar F (which I still own and never use) on a blue Monday (1985?) because I felt it would give me an edge in my portfolio.
Anyway, I worked with almost every professional tool you can imagine.
Only a couple of years ago, I found a deal on the internet that was too good to be true. I made a ridiculous low offer on a Sinar P 3 with Sinaron 90 mm digital lens (both like new). Since I already owned an Aptus 65 I purchased a adapter for it and made this into one package. Luckily I stayed with Capture one pro 11 ,
added a second hand MacBook Pro with FireWire connection and I couldn’t be happier ever since. I use it exclusively in ,what I call, my studio, here in Arnhem.
These are my absolute favourite tools I like to work with, that create the pictures I envision and wouldn’t change that for anything out there. (Altough that Fuji GFX with live view………)
Not sure how many people work this way but I am glad I found your post. Nice to know I am not the only one in this country!
Regards,
Colin
Cool story Colin, thanks for sharing! I have looked into the Sinar P3 as well, great setup with an Aptus 65 I imagine.